Explore Roll20's redesigned Toolbar UI and Measuring Tool with DM Lytha. Discover new features, from the Settings Menu to the Spell Effects Tool, and master the Measuring Tool for precise gameplay.
New Roll20 Toolbar and Measuring Tool
Introduction
Hi Guys! DM Lytha here and today I am going to go over Roll20’s new Redesigned Toolbar UI, including their awesome new measuring tool!
To Opt-In to use the new toolbar, it’s as easy as clicking the “Try the new toolbar” in your chat, or you can go into your setting via the cog wheel on the top right-hand side, go to personalization and display, and toggle the “UI Redsign” button. Once you’ve activated the new UI, Roll20 will automatically reload the page with the new toolbar.
As you can see the new toolbar now takes up the entire left side of the page. While this does take up more space on the window, it does allow you to collapse the toolbar hiding it away until you need it again.
Next we’ll go over each of the tools and how they work.
The Settings Menu
The Settings Menu is an excellent new feature that allows you to change the opacity of the GM Layer without having to worry about hovering over the menu. Once the menu has been opened with a simple click you can use the slider to adjust the GM Layer’s opacity. This menu also allows you to copy your game link to give to new players, toggle your dark and light modes, leave feedback on the new toolbar, opt-out of the new UI preview, and finally leave the game.
Select and Pan Tools
Next we have the Select Tool, which works exactly the same way as before, you select the tool by clicking on it and then use it as you normally would.
Right under that we have the new Pan Tool. By selecting the Pan Tool you are able to drag around the map without the fear of accidentally selecting a token, or map asset, and moving it instead.
Drawing and Text Tools
Unlike the old UI where you would have to hover over the tool, make your selection and then from the pop-up menu, choose your colours and line size, you can now make all your selection in the same menu.
To open the Draw Tool menu, you just left-click on it, and it pops up with all your options available. From here you can choose your drawing tool, colours, and line sizes. To close the menu, simply click on it again and it will close leaving the colour and line size toolbar up so that you can quickly change them while drawing.
This is especially important while drawing on Dynamic Lighting Layer, as it also includes the line type. You can easily swap between wall, one-way and transparent lines without ever having to go back into the menu!
The Text Tool works the same way as before. You select the tool and the Font Toolbar pops up, allowing you to select your font, size, colours and of course your bold and italic options. Once you’ve made your selections, you left-click on the map and start typing. Once you’re done right-click on the map and viola, you have your text!
Spell Effects and Lighting Tools
Moving on, next we have the new Spell Effects Tool! This cool new tool allows you to add animated spell effects to your games, bringing your games to the next level! To use the spell effects, you left-click on the Spell Effects Tool which will pop-up the spell effects menu.
From here you can choose which area of effect type you want and the animation type. For this example we’ll use Explosion and Fire. Now you just left-click on the area you want the animation to take effect. Make sure to play around with the different effects, as they all behave in unique ways!
The Lighting Tool functions exactly the same as before, except that instead of hovering over the tool to make your selection, you left-click on it, opening the menu, and make your selection.
Legacy Fog of War
Right below the Lighting Tool we have the Legacy Fog of War Tool. This is for the GMs that prefer to use the traditional method of map vision instead of Dynamic Lighting. Like with our other tools, your left-click on the tool, which pops up it’s menu.
From here you can select whether you want your vision blocking to be permanent or explorable, meaning the players can enter the blacked out area, revealing what’s hidden beneath. You can also select whether you want to hide or reveal an area and what kind of drawing tool, rectangle or polygon, you want to use.
The New Measuring Tool
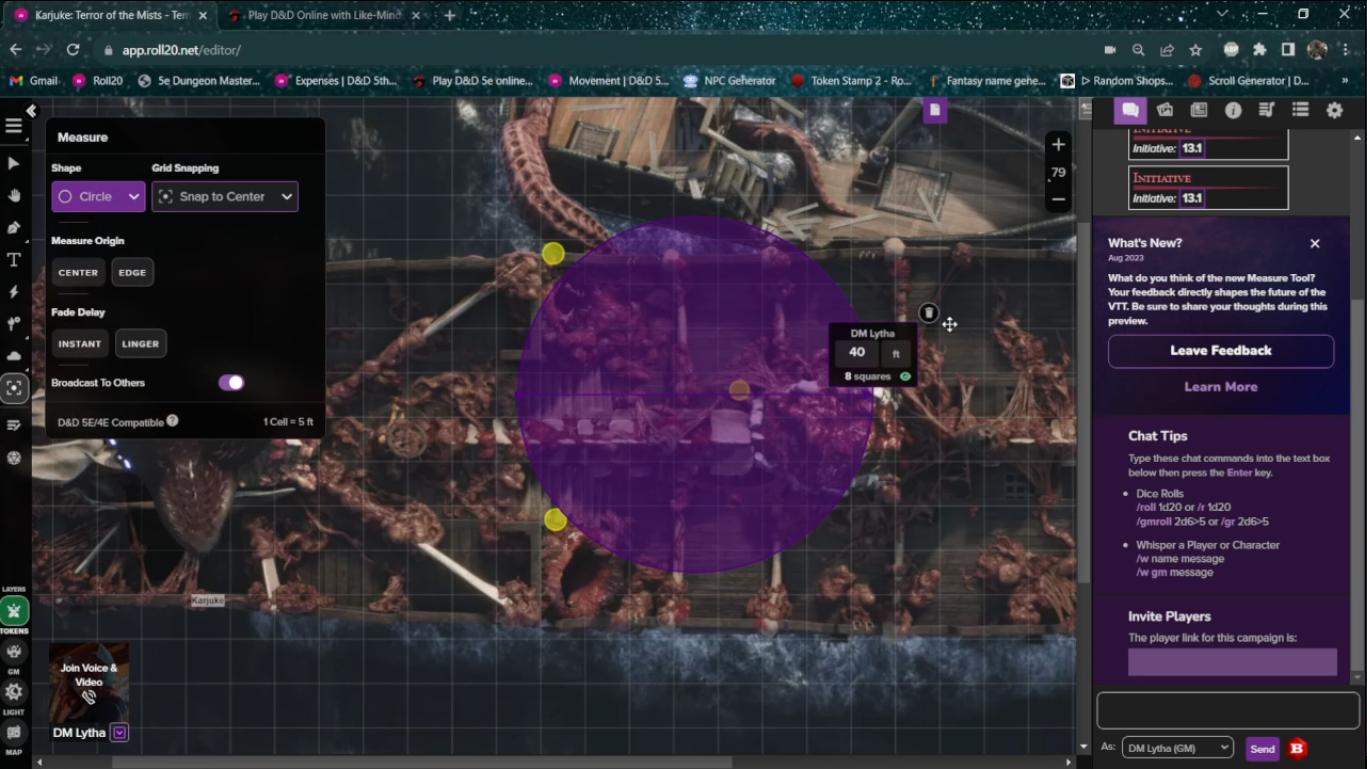
Next up we have the newest feature that I’m the most excited about, the Measuring Tool. The new Measuring Tool now allows you to now not only measure your distance from point A to point B but also measure out your spell area of effects! To use the Measuring Tool you click on it, popping up it’s menu. From this menu you can choose what shape you want; Line, Square, Circle, Cone or Beam.
Like before you can choose whether or not you want to have it snap to the grid, and if so from the edge, or the center, of the square. Depending on which shape you choose, you will have different options.
Let’s take a look at the circle. When you select the circle it gives you the option to choose which measuring point you want to start from. This allows you measuring from the point of origin, perfect for measuring an effect that uses a radius, or from the edge of a square, perfect for when you need to avoid hitting allies!
You can also choose whether you want the area measured to be instant or linger. By selecting linger the measured area remains on the map until you either delete it by left-clicking the delete button on the area of effect, or use the measuring tool again.
By having your measured area linger, it allows GMs to be able to see which creatures are effected for a longer period of time, making it perfect for when a Fireball takes out an army of Kobolds!
The final option is Broadcast To Others, this allows you to hide your measurements from the other players, though, as before, not from the GM. The colour of your measuring tool is defaulted to the colour you’ve chosen next to your portrait, allowing everyone to be able to see whose measurements are whose.
Turn Order Tracker and Dice Roller Menu
Below the Measuring Tool we have the Turn Order Tracker and Dice Roller Menu. To reveal the turn order, click on it and it pops open. The turn order is mostly the same except for a few new features that makes moving through combat a little bit easier.
The first of these is the sort button, this allows you to sort everyone that is in the turn tracker in either ascending or descending order by just clicking the sort button, instead of having to go into the settings. They also added a token counter, which allows you to see how many tokens have been added to the tracker, and a back button, which allows you to go back in the order, just in case someone’s turn was accidentally skipped.
Below the tracker we have the Dice Roller Menu. As with all the tools, you click on it to open the menu, and from there use the dice menu as before, selecting which die type and how many. The only difference with the new roller menu is that the GM Roll is now a toggle switch instead of clicking to highlight the option
The Layer Buttons
Finally we have the Layer buttons. Instead of having the hover over menu to select which layer you want to work on, you just click the layer you want, Token, GM, Light or Map. This allows you to swap between layers more quickly, making your sessions move much more seamlessly!
In Conclusion
These new changes not only look nicer, but makes for a more enjoyable gaming experience for both GMs and players. I hope that you found this video helpful and I can’t wait to see what else Roll20 has in store for us!
Related Posts